
seunghyun Note
Singly Linked Lists with JS 본문
코딩테스트를 공부하면서 프로그래머스 lv0~lv1 쉬운 버전들, 백준 실버 5 까지는 풀어도 linked list, stack & queue, tree 등 다양한 자료구조와 알고리즘 문제들이 나오면 과거에 배웠던 것을 망각하고 문제를 거부하게 되는 거 같다.

괜히 JS를 사용한다고 특별히 다른 것들도 아닌데 못쓰는 것을 보면 개념이 부족하다는 것을 느끼고 과거에 들었던 강의를 복습하며.. 알고리즘 학습을 다시 하게 됐다!
당분간 공부할 것들을 정리해보면...
- 단일 연결 리스트
- 이중 연결 리스트
- 스택 & 큐 (배열로 하는 방법은 숙지했음! linked list로 구현해 보기)
- 이진 검색 트리
- 트리 순회
- 이진 힙
- 해시 테이블 (사용해 봤지만 복습)
- 그래프, 그래프 순회
- 다익스트라 알고리즘
- 동적 프로그래밍
할 것이 많다... 천천히!!! 특히 빨간색 파트는 더 열심히 해보자 (처음 해보는 것들)
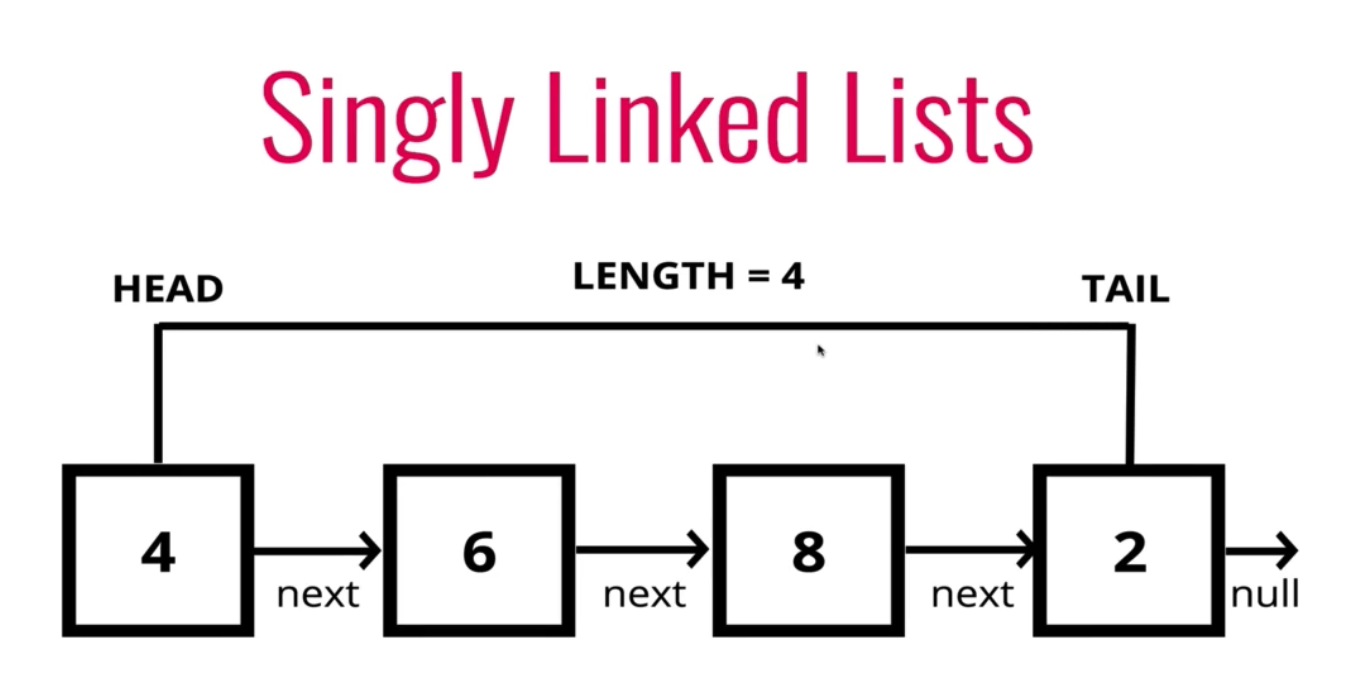
Singly Linked Lists

연결리스트는 데이터 엘리먼트를 가리키는 인덱스 없이 다수의 데이터 엘리먼트로 구성되어 있다.
(객체들이 연결되어 있는 기차와 같음.)
여기서 각각의 엘리먼트를 우리는 노드 라고 한다.
각각의 노드들은 문자열 혹은 숫자와 같은 하나의 데이터 엘리먼트를 저장한다.
계속해서 다음 노드에 저장하고 아무것도 없음을 의미할 때는 "null"로 저장하는 게 linked list의 방식이다.
다음으로는 헤드와 테일
헤드는 연결 리스트의 시작 노드를 가리킨다. 테일은 연결 리스트의 마지막 노드를 가리킨다. (테일은 중간에 있는 노드들을 일일이 추적하지 않는다.)
노드들의 움직임과 각 자료구조의 작동원리를 자세하게 시각화로 보여준다.
코드도 함께 구현해 주니 참고하면 좋을 거 같다.
visualising data structures and algorithms through animation - VisuAlgo
VisuAlgo is generously offered at no cost to the global Computer Science community. If you appreciate VisuAlgo, we kindly request that you spread the word about its existence to fellow Computer Science students and instructors. You can share VisuAlgo throu
visualgo.net
array와 비교
lists
- Do not have indexes!
- Connected via nodes with a next pointer
- Random access is not allowed
Arrays
- Indexed in order!
- Insertion and deletoin can be expensive
- Can quickly be accessed at a specific index
Linked list 구현과 push를 구현해 보자
class Node와 linkedList 객체를 만드는 것까지는 이해가 됐다.
하지만 push 내에 아래 부분이 이해가 되지 않았다.
else {
      this.tail.next = newNode;
      this.tail = newNode;
    }
linked list는 각자의 방법으로 그림을 그려보는 것을 추천한다. ( 내 방법이 옳지는 않다.. 하지만 이해만 된다면!!)

// piece of data - val
//reference to next node - next

class Node{
    constructor(val){
        this.val = val;
        this.next = null;
    }
}

class SinglyLinkedList{
    constructor(){
        this.head = null;
        this.tail = null;
        this.length = 0;
    }
    push(val){
    let newNode = new Node(val);

    if (!this.head) {
      this.head = newNode;
      this.tail = newNode;
    } else {
      this.tail.next = newNode;
      this.tail = newNode;
    }
    }
}

// var first = new Node("Hi")
// first.next = new Node("there")
// first.next.next = new Node("how")
// first.next.next.next = new Node("are")
// first.next.next.next.next = new Node("you")

var list = new SinglyLinkedList()
list.push("HELLO")
list.push("GOODBYE")
pop을 구현해 보자
pop은 Push를 이해하니 정리가 잘 됐다.
pop의 가장 중요한 것은 순회할 tmpNode를 생성해서 순회시키는 것이다.
tmpNode = tmpNode.next 방식으로 처리해 주는 것이다.
그리고 while문에서 tmpNode로 순회하는 것이 아닌 tmpNode의 next 노드로 순회시켜 그 전의 node를 파악할 수 있다.
그 전의 node를 반환해서 next와 tail을 변경해서 마지막의 값을 외톨이로 만들어버리면 된다.
  pop() {
    let tmpNode = this.head;
    let newTail = tmpNode;
    if (!tmpNode) console.log("empty!");
    else {
      while (tmpNode.next) {
        newTail = tmpNode;
        tmpNode = tmpNode.next;
      }
      this.tail = newTail;
      this.tail.next = null;
      this.length--;
      if (this.length === 0) {
        this.head = null;
        this.tail = null;
      }
      return tmpNode;
    }
  }
shift를 구현해 보자
shift는 pop을 해서 그런지 매우 간단했다.
1. head가 null 일 경우 undefined
2. head를 따로 저장한다.
3. 현재 head가 가리키는 것을 next로 연결한다
4. 길이를 -1 한다.
shift() {
    if (!this.head) return undefined;
    let shiftNode = this.head;
    this.head = shiftNode.next;
    this.length--;
    return shiftNode;
  }
나머지 함수들은 다음 시간에...! (안 할 수도)

출처 : https://www.udemy.com/course/js-algorithms-and-data-structures-masterclass/
'코딩테스트 > 코테를 위한 알고리즘 & 자료구조 정리' 카테고리의 다른 글
| Tree traversal(1) with JS (0) | 2024.02.14 |
|---|---|
| BST(Binary Search Tree) with JS (0) | 2024.02.07 |
| Queue with JS (1) | 2024.01.30 |
| Stack with JS (0) | 2024.01.25 |
| Doubly Linked List with JS (0) | 2024.01.25 |


